Migrating Only Apple Mail to a New Mac (Monterey)

When you buy a new Mac there is an easy way to migrate all of you data, programs, settings, logins: Just use the Migration Assistant. Most of the times it works magically. You basically end up with a 1:1 system after the migration. Awesome!

The downside: you are always carrying old crap with you. Old software and other stuff you were piling on your system. On my old Mac AWS CLI suddenly stopped working and I was unable to quickly repair it using homebrew, pypi or any other approach. I like to work from Docker containers so that was not a huge issue. But migrating that broken system to a fresh new MacBook? Not so much!

Nowadays, most of my documents, passwords and settings are in iCloud because of the many Apple devices that I use all the time. So why bother migrating all the old crap, if you can have a clean install. It is my first time using this approach since 2005.

Previously, on Windows, migrating was not an option. Win got corrupt in such unpredictable ways and migration routines just didn’t work as expected. It was a relief to get a clean system. But then you started with an empty box. No software, no settings, no data, no favorites… Hours and hours of setup time.

OK, back to the issue at hand: We have a new system, download the software and configure some special custom settings (key shortcuts and other system and application preferences. BTW @Apple, why are settings not stored in iCloud?), and we are mostly done.

But what about mail? I’ve been storing mail in local folders on a yearly basis. I want my stuff to be local. It is private and I want full control over it, so I use POP3 and have old mails on one of my Macs. After the end of each year I grab all the mails from the inbox and put them in a newly created year folder (2021 e.g.). It is not polluting my inbox anymore, but it’s still searchable in Mail. It is such a comfortable thing to have 15 years of emails available at all times. Mail search is truly amazing!

With Migration Assistant mail gets transferred 1:1. When you do a fresh install, you loose all old mails. What can we do about that?

The solution: Migrating only Mail to the new Mac

A word of caution: This procedure worked for me. Don’t hold me accountable if it doesn’t work for you. Backup your data and be prepared to restart from scratch if needed. The procedure was tested only with the same version of MacOS on both systems with iCloud passwords turned on.

Apple Mail is stored in your user’s home directory in the Library folder ~/Library/Mail, so we will copy those directories to the new Mac. However, we also need to copy ~/Library/Accounts, where the Mail account info is stored. If you are using iCloud passwords, that seems to be all we need to copy.

Fetch new incoming mail on the old Mac, then stop Mail on both Macs. On the new Mac backup all files and folders in the ~/Library/Mail and ~/Library/Accounts folders by appending “.old” to the file and folder names. Then copy all contents of these two folders from the old Mac to the new. Start Mail on the new Mac. That’s it. You should already see all mailboxes set-up correctly.

In my case Mail search didn’t work correctly, so I additionally had to reset the search index (see https://www.macobserver.com/tips/how-to/fixing-broken-mail-search-macos/): Stop Mail app on the new Mac, restart it while holding shift key when clicking on the Mail icon. Mail starts, stop it again and repeat with shift key. Then stop Mail and restart your Mac. After this procedure, your search index will be rebuilt (which is going to take some time). Done!

This worked for me, so I hope it is going to be helping you, too!

Posted in Uncategorized | Tagged , , , , | Comments Off on Migrating Only Apple Mail to a New Mac (Monterey)

Docker Secrets without Swarm on a Mac

Say you want to use credentials to communicate to a protected API from a Docker container on your local machine. You don’t want to put them into your code, of course. On Kubernetes and Docker we have secrets. But we are running locally, not on a Kubernetes cluster and Docker secrets can also only be used when running in swarm mode. If you don’t want to use swarm you still have environment variables.

Environment variables are not a great solution security wise, but locally, if we just want to remove them from any source or property file, we can use the MacOS keychain. To create a password:

security add-generic-password -a "$USER" -s 'my-xyz-password' -w 'Start123'

Then, when starting a container, pass the password in into the container using environment variables:

docker run -ti -e MY_XYZ_PASSWORD=$(security find-generic-password -a "$USER" -s 'my-xyz-password' -w) node bash

From within the container you can access the password from the environment, depending on the tools you use. From a shell:

echo $MY_XYZ_PASSWORD

From node, you can access it from the variable:

process.env.MY_XYZ_PASSWORD
Posted in Uncategorized | Tagged , , , , | Comments Off on Docker Secrets without Swarm on a Mac

Multiline LaTeX Formulas in Keynote

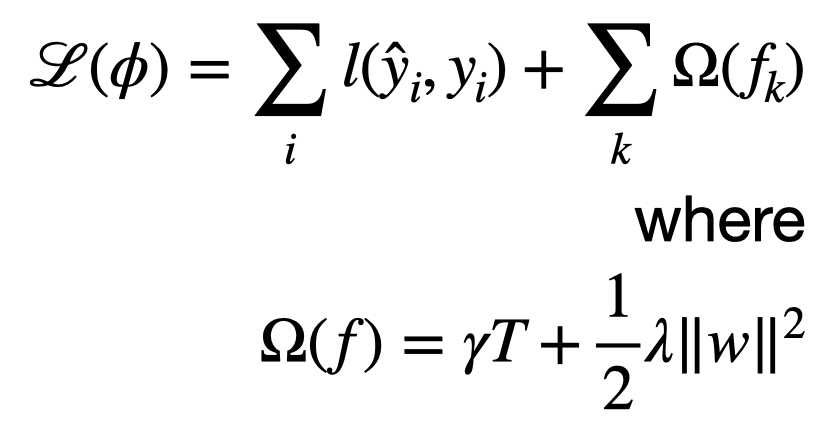
Apple Keynote’s support for LaTeX formulas is awesome: go to Insert/Equation… and enter LaTeX code directly (you can also use MathML). The code will be evaluated and results displayed as you type. Here you can find some examples. As a general rule, you should probably write multiple lines of equations as multiple individual equations and then align them using Keynote.

If however for some reason you would like to write a single multi-line equation you can use an aligned block and double backslashes to create newlines:

\begin{aligned}
  \mathcal{L}(\phi)=\sum_i{l(\hat{y}_i,y_i)}+\sum_k{\Omega(f_k)} \\
  \text{where} \\
  \Omega(f)=\gamma T+\frac{1}{2}\lambda\|w\|^2
\end{aligned}

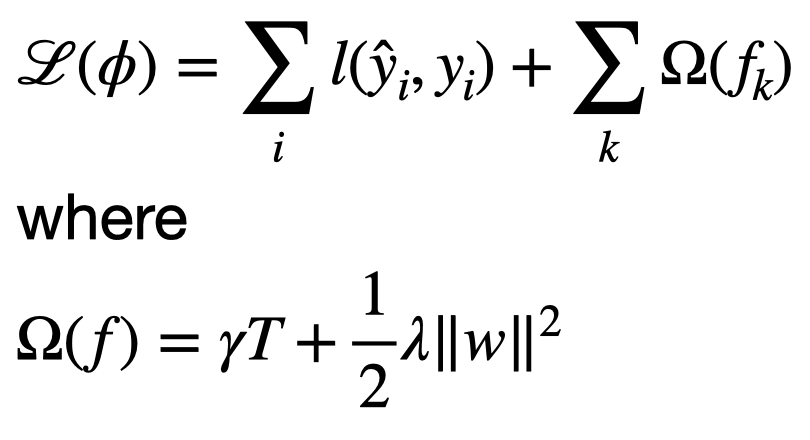
The text will be right-aligned. Add ampersands to the beginning of each line to left-align:

\begin{aligned}
& \mathcal{L}(\phi)=\sum_i{l(\hat{y}_i,y_i)}+\sum_k{\Omega(f_k)} \\
& \text{where} \\
& \Omega(f)=\gamma T+\frac{1}{2}\lambda\|w\|^2
\end{aligned}
Posted in Uncategorized | Tagged , , , | Comments Off on Multiline LaTeX Formulas in Keynote

Universal Clipboard Fix for Mac and iPhone Quick Fix

If your handoff between two devices suddenly doesn’t work, check if this helps. Run in Terminal:

defaults delete com.apple.coreservices.useractivityd.plist ClipboardSharingEnabled

Explanation: For some reason I found ClipboardSharingEnabled = 0 setting in my defaults.

defaults read com.apple.coreservices.useractivityd.plist

Posted in Computers, Operating systems | Tagged , , , , , | Comments Off on Universal Clipboard Fix for Mac and iPhone Quick Fix

Fixing Squished Images in WordPress 5.5 Theme

After auto-updating to 5.5 my WordPress site got ugly from day one and I didn’t even detect it. All the images were distorted, the aspect ratio of the image was not being respected. Googling didn’t immediately reveal the problem, so here is how I finally quick-fixed it:

Go to Appearance / Customize / Additional CSS and paste in the following snippet:

img {
  max-width: 100%;
  height: auto;
}

Dear WP devs, would you pls be so kind and test before rolling out. Breaking changes like this should get more public attention.

Posted in Uncategorized | Tagged | Comments Off on Fixing Squished Images in WordPress 5.5 Theme

Upgrading a Base 2019 iMac 21″ to 32GB, 1TB SSD and i9 9900 CPU

Finally I found time and motivation to upgrade an absolutely plain iMac 2019 with 8GB, 1TB hard drive and a i3 8100 CPU to super specs. It’s the third iMac that I cut open to up the RAM / SSD and this procedure has become second nature to me. Repairability and upgradeability are very important topics if you really want to claim to be a green company. Apple is on an extremely bad path here: claiming to be the greenest computer manufacturer but crippling its products with planned obsolescence. And that’s completely unfair to its devices: an iMac is like a Porsche, you never throw it for scrap.

Upgrading RAM is easy on a lot of 27″ iMacs, but as soon as you want to replace the crippling hard drive you are out of luck. You have to cut the device open. On 21″ iMacs RAM is often also replaceable once you cut it open. So these questions come up: What should I go for when upgrading? What will give me the best results?

A typical Mac user will benefit most from an SSD. Booting time, application startup, noise level are all improving by factors once you install an SSD as a replacement for the hard drive. In systems without Apple’s fusion drive, you have to install a SATA SSD. I am using Samsung EVO 860 1TB drives. You basically should not go for anything smaller, due to the fact that you have to cut the adhesives of your iMac. This is my absolutely favorite upgrade, you just can’t use a Mac without it! There is plenty videos on YouTube giving advice on the procedure. If you have a fusion drive Mac, you might try to install a M.2 with an adapter.

RAM upgrades will give you the best outcome if you are a power user and are switching back and forth between RAM-hungry apps, like Photoshop, Logic Pro, FCPX all the time. 8GB are still OK for most purposes but going 16GB will soon become a must if Apple is inflating the executables more and more. Now, if you are going for that ugly opening procedure, you might as well already install 32GB, since many iMac 21″ are supporting this as a maximum and prices are low (150€ for 32GB as compared to +600€ from Apple).

Once you have these two options in your iMac, you will have a machine for years (until till Apple makes them obsolete by preventing new OS upgrades for no (real) reasons). I have run a test on a base 2017 iMac with 32GB of RAM and 1TB SSD. I run Logic Pro X with a complex demo project, recorded a screencast, run FCPX with a movie playing back, opened all iWork apps, Notes and more, switched between apps with no visible strain or pausing between apps responding. And as a bonus: with the base CPU the fan did not pick up speed, I just couldn’t get it to rev up. So I think this is the best what you can do to your Mac.

If however you are keen on upgrading your CPU, this is possible in some of the 21″ iMacs, specifically the 2017 and the 2019 one. In the 2017 you can upgrade the 6th-Gen path CPUS, but in the 2019 you can switch from 8th-Gen to 9th-Gen CPUs. Now, to prove the point that this is possible, there is an option to upgrade the corresponding 2019 iMac 27″ to the i9 9900K. There is also some upgrade videos on this topic. However, the 27″ iMac as a different thermal spec that the 21″, so it would probably not be a great idea to use the overclocking i9 9900K in the 21″. Therefore, some folks have replaced i9 CPUs in 21″ iMacs. Some used 9900T (for laptops) and some used the 9900KF (without onboard graphics). None of these K, KF, T were an option for me. I was looking into the i9 9900 (no additions), so as soon as I got hold of one of these reasonably priced (350€), I purchased one.

Yesterday was the day: installed all components using YouTube guides and all works nice. One remark on the installation of the fan on top of the new CPU: Since the thermal paste is sticky, while installing the fan you might move the CPU out of its locked position. That would be a disaster. My approach: there is a piece on the back side of the CPU PCB that can be used to align the cooling piece to the CPU.

I attached that piece to the back side of the motherboard and used it to carefully first position the cooler to the CPU (put it onto the two bolts), hold it firmly in place with one hand and attached the coolers to the GPU first (GPU not CPU), then screwed to cooler to the PCB with the two screws. Only then I began screwing in the screws on the backside of the CPU. Be careful, these screws have to be pressed in quite strongly before you can begin screwing. Don’t break the board, apply pressure at the backside of where you are screwing. Worked for me.

As I sad previously, you won’t need the CPU upgrade. It even has downsides of all powerful CPUs: the fan is running during CPU-heavy workload. Also the installation is not super easy.

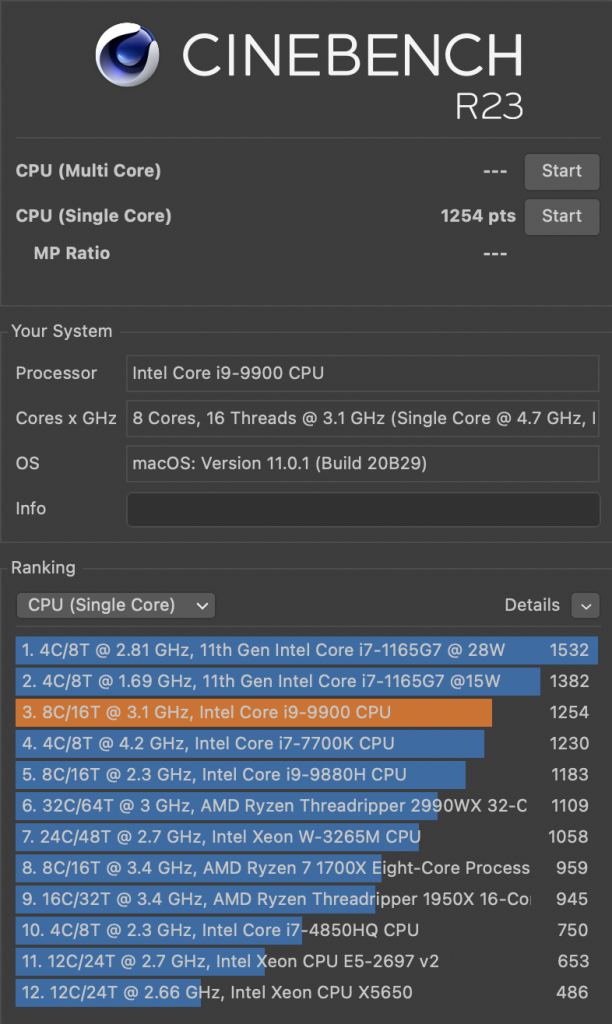
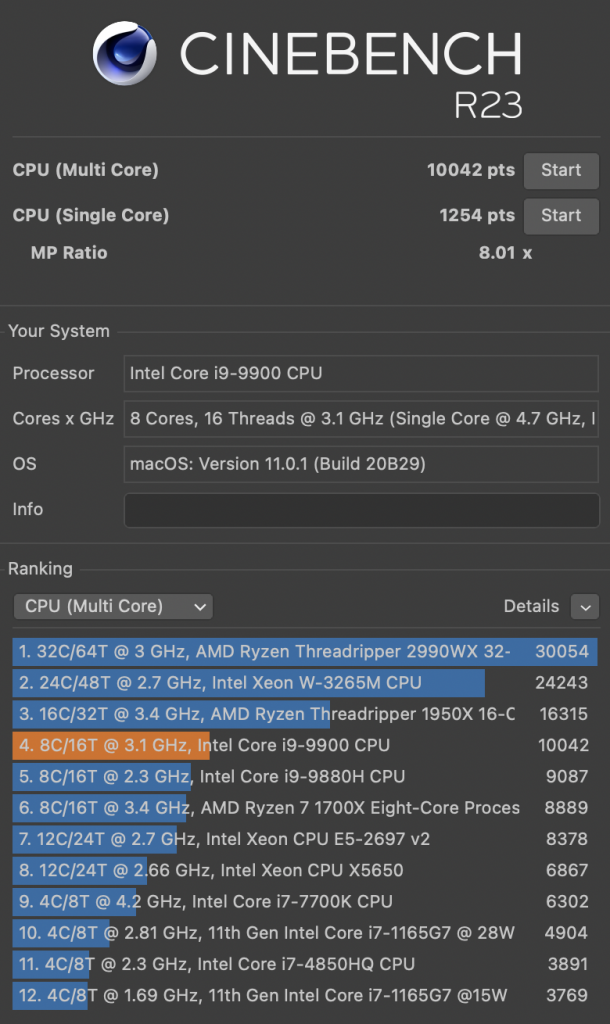
Here is some Geekbench 5 comparisons:

Benchmarki3 8100i9 9900
Geekbench 5 Single8931250
Geekbench 5 Multi33898001
Cinebench 23 Single1254
Cinebench 23 Multi10042

The Cinebench Multi Core score is quite remarkable since its considerably faster than the new M1 scores! But of course at a completely different power and thermal factor.

I love the upgrade, since it makes my iMac a unique piece. If anyone on this planet exists with an iMac 21″ with a i9 9900, please reach out to me on Twitter.

Warning: You will loose warranty on any of the upgrades described above. You may even be destroying your computer. Apply at your own risk!

Posted in Computers | Tagged , , , , , | Comments Off on Upgrading a Base 2019 iMac 21″ to 32GB, 1TB SSD and i9 9900 CPU

Enter Test Mode on Roland XV-5080 (works)

The service manual for the XV-5080 describes a wrong procedure for entering test mode. The correct method is:

  • Switch off device (if on)
  • Hold EXIT then power on device
  • Keep holding EXIT until the “SYSTEM/UTILITY” LED lights up (this takes quite a few seconds)
  • Release EXIT
  • Hold “SYSTEM/UTILITY” until “wait a moment” appears in the middle of the screen (also takes a while)

Navigate in the test mode using SHIFT+BANK and TONE buttons.

Posted in Uncategorized | Tagged , | Comments Off on Enter Test Mode on Roland XV-5080 (works)

Using Roland XV-5050 via USB MIDI on MacOS

If you want to use your XV-5050 with a newer version of MacOS, you don’t have to install a driver. The driver supplied by Roland in 2000 will not work, of course! We will use the generic class compliant USB MIDI driver. To do so, on XV-5050 press System and in MIDI&USB settings select USB Descript. Set it to GENERIC, press utility to save the settings (deactivate write protection) and reboot the synth. Check the setting again to make sure everything worked correctly.

Now you can use your Roland XV-5050 on modern Macs over USB.

Posted in Uncategorized | Tagged , , , , , | Comments Off on Using Roland XV-5050 via USB MIDI on MacOS

Roland XV-5050 Repair

I got a hold of a broken XV-5050. When switched on, it would only display a blank screen and that’s it, no sound, no reaction. After checking audio (no noise whatsoever), it soon became obvious that the device isn’t booting. Two reasons that were discussed on the web seemed plausible:

None of the reports above talked about a completely bricked device, however. While I was leaning toward the second hyp0thesis, I replaced the caps nonetheless, since Roland devices at that time contain notoriously bad caps (see JV-SR cap warning). As expected, the replacement didn’t help.

My assumption was that the device wouldn’t receive a proper reset signal, but that wasn’t the case. Reset was pulsed and the device should start up. So, maybe there was an unsuccessful attempt to update the firmware of the device. The JP-8080 service manual has got a particularly nice update section:

In step (7) of this procedure, if “Completed” does not appear within 40 seconds after pressing [REC] or if the message “Can’t update!” appears, then the version upgrade is a failure. When this occurs you must replace the main board.

Replace the main board if update is unsuccessful, nice!

So I put the XV-5050 in its firmware update mode (press < and > while powering up the device). And sure enough: “Update by MIDI” appeared. Finally some text! Ok, before trying that, lets check test mode (press EDIT and TONE 4 while booting). To no avail. So back to the firmware update: “Press Patch Finder”. Did it. “Error! Flash ID”.

Ah, possibly the flash chip has got problems and the device couldn’t start up properly. And in contrast to the JP-8080 Roland managed to get to two step bootstrap, so as not to break the device while updating. Nice!

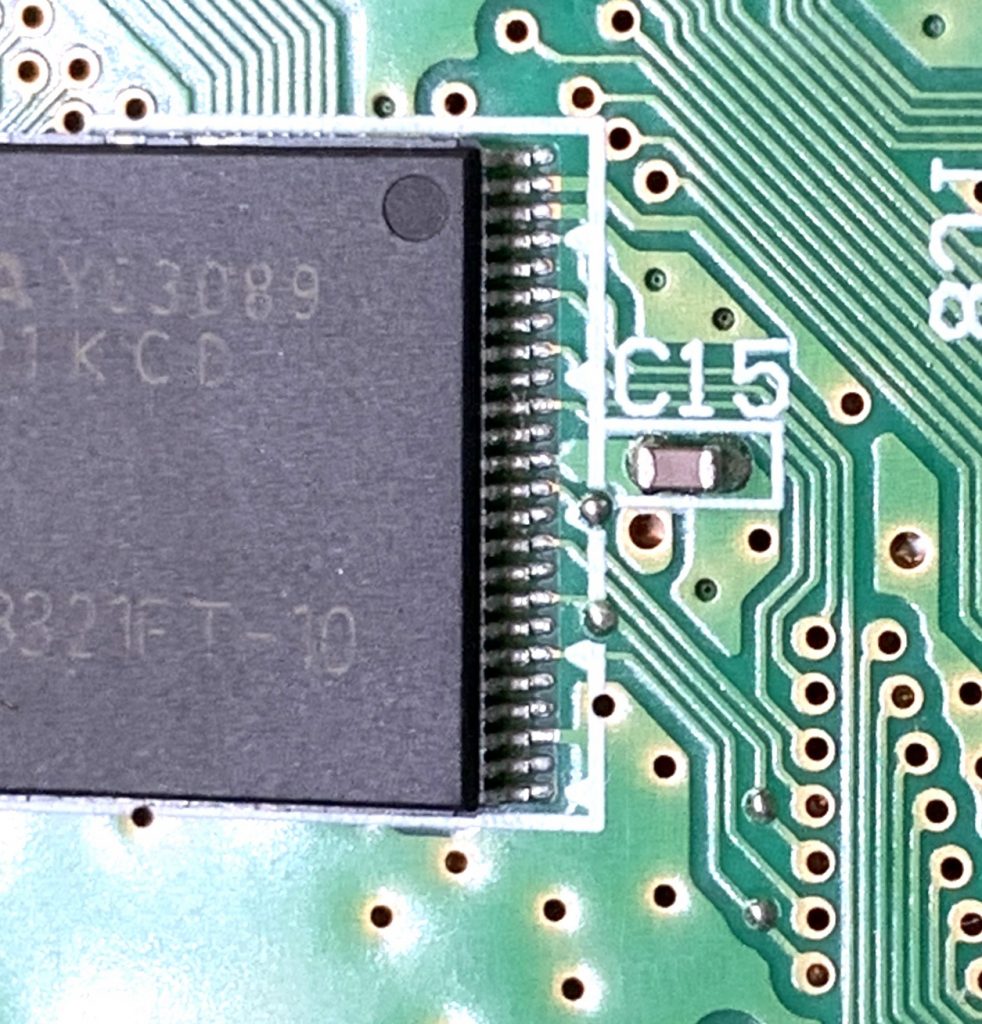
The flash chip revealed bad solder joints.

Applied pressure on the the chip and yay, it starts and plays sound. Resolder. Done. Great little sounding device! But now, how do we get USB to run on Big Sur (OS X)?

Posted in Uncategorized | Tagged , | Comments Off on Roland XV-5050 Repair

Roland XV5080, XV3080 Rotary Encoder Problem Fixed!

This week I received a nice second-hand XV3080. Everything worked fine, except the unit had the dreaded rotary encoder problem: Turning left, values decreased just fine, turning right and strange things happened. Sometimes values went up, sometimes they stayed put and sometimes they decreased!

A service manual is available, so far so good. But the actual encoder, a part from Alps is not to be had on the market. There exist some replacement tutorials, but none of them does a great job for a quick fix. My assumption is that the part just needs some cleaning…

A rotary encoder is a quite simple and purely mechanical device as you can see here, so my assumption seemed quite plausible and I also found a corresponding repair video for the Waldorf Blofeld.

So if you have the same problem, some experience with screwing 🙂 and 15 to 30 mins time: it’s an easy fix. But as always: you are responsible for your device and you are going break thinks if you have two left hands.

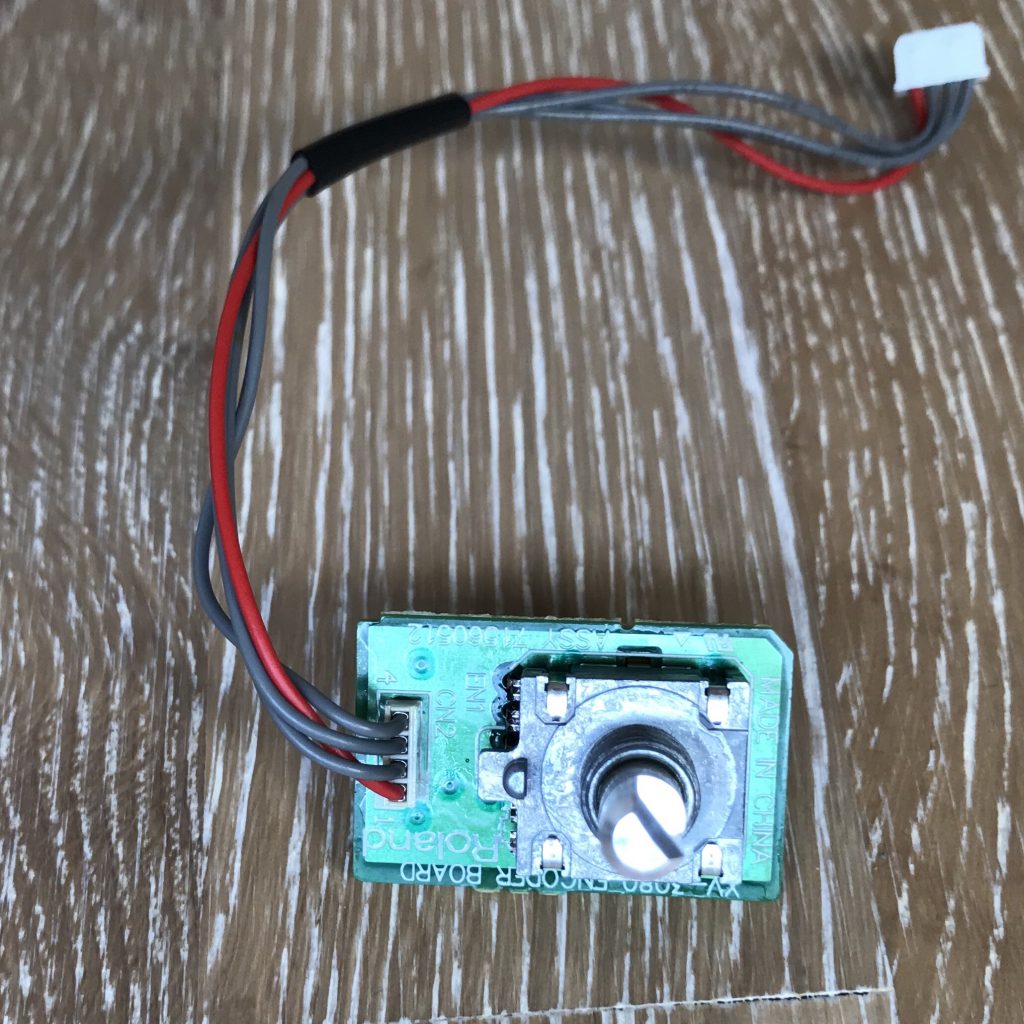
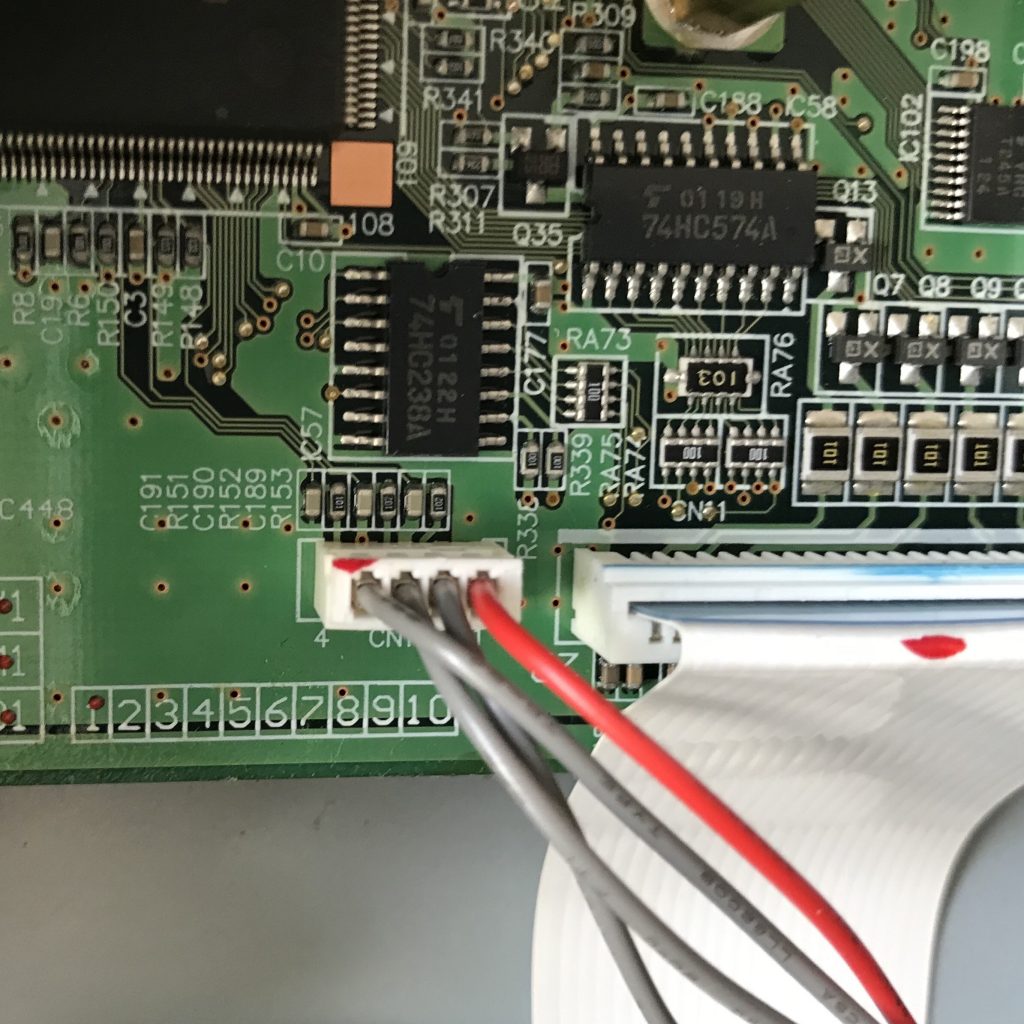
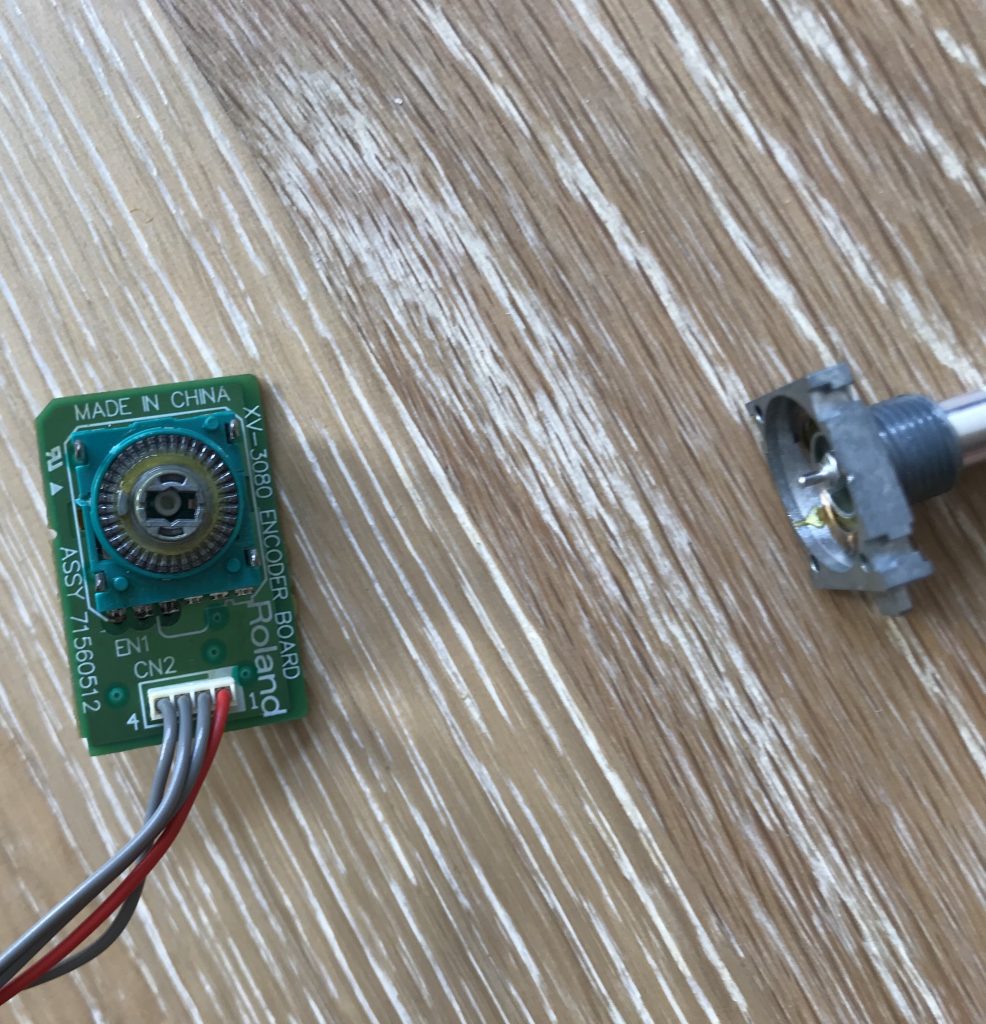
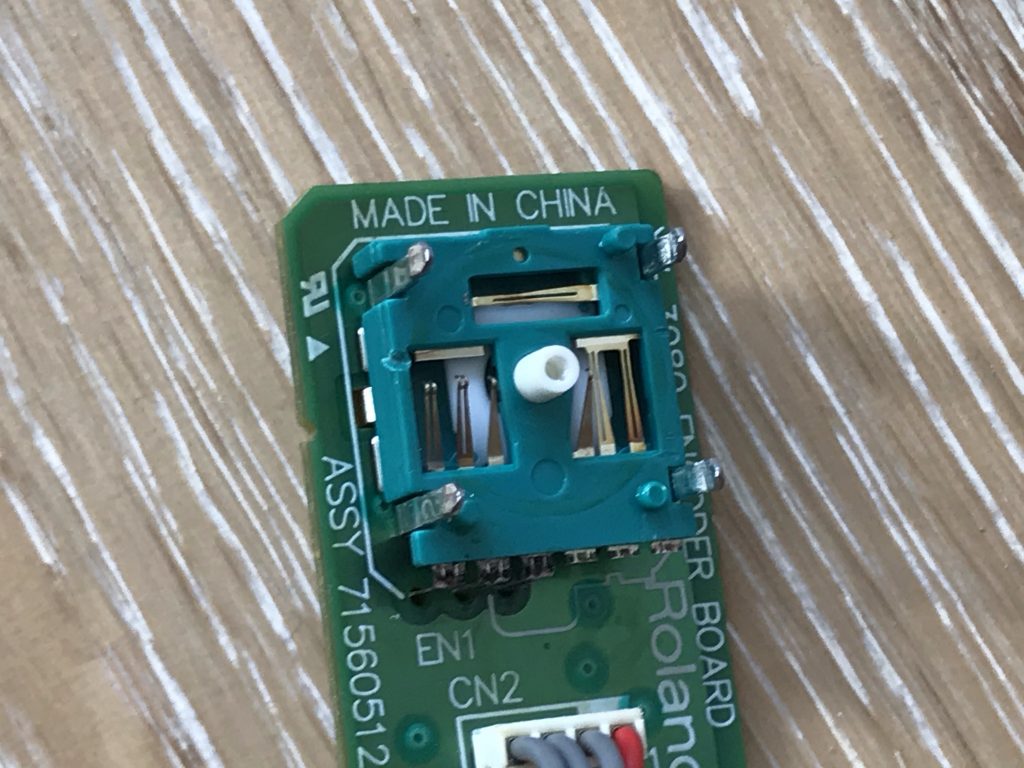
You cannot remove the rotary encoder cap before removing the front panel! Open the top lid and unscrew the front of the synth (see service manual). Remove the encoder cap and unscrew the PCB (Panel-A Board) to unveil the nut that is holding the rotary encoder and its PCB (Encoder Board). If you want to remove the encoder cabling from the synth you will also need to unscrew the expansion base board and then detach the 4-pin connector from the main board.

4-pin connector for the rotary encoder

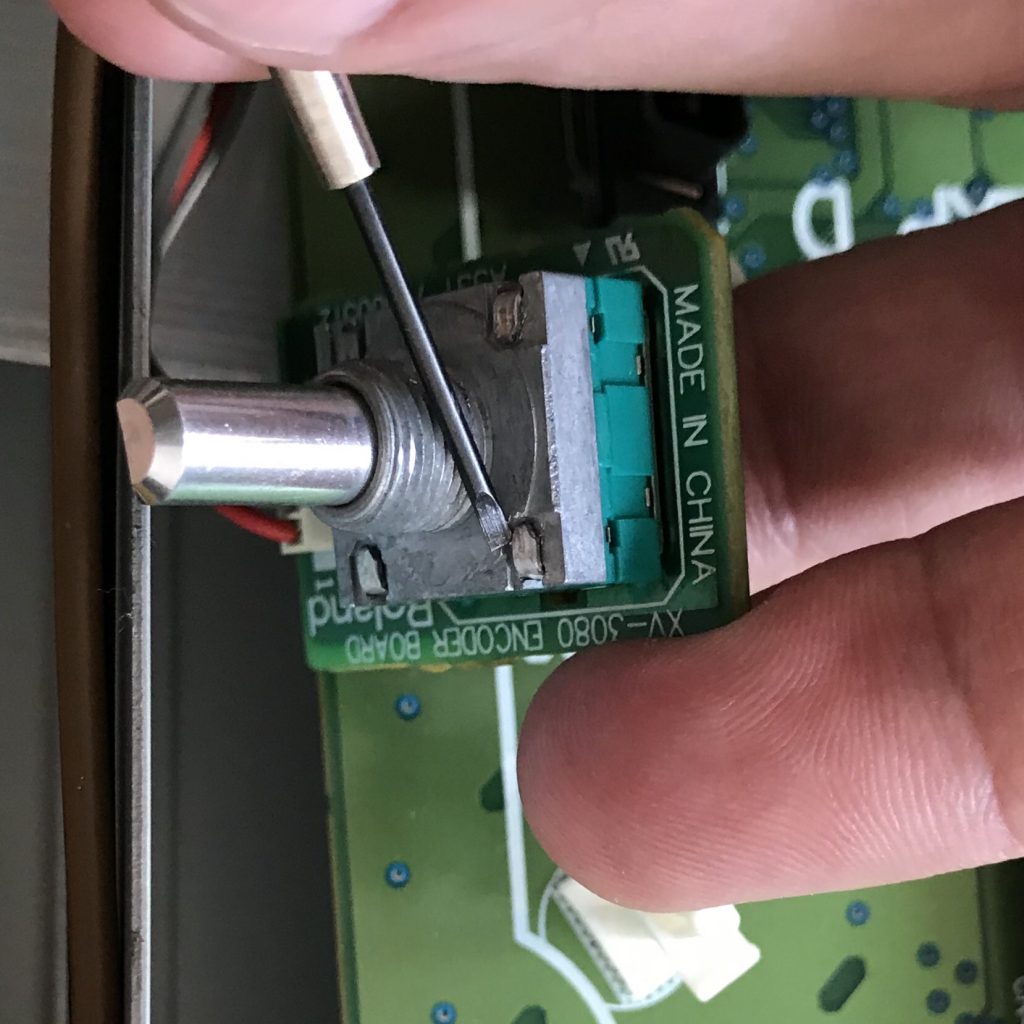
Now that you have the encoder in front of you use a mini flat screwdriver to flip the ears from the metal body of the encoder. Use the inner side to get a good grip.

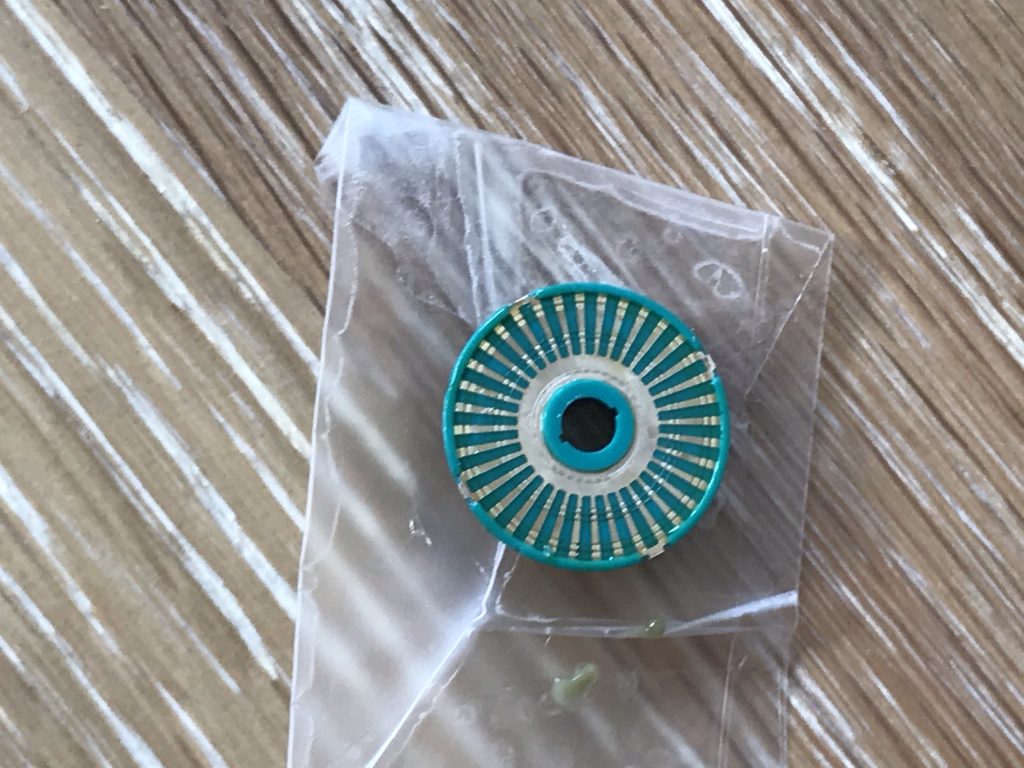
Straighten the metal bands so they are completely flat and then use the screwdriver (a cutter might be a better choice) to loosen the metal head from the green rest of the encoder by prying. By careful, the green plastic is quite soft and consists of multiple layers. Pry open the metal piece and detach it from the rest. Be careful to not lose any pieces or break the thin contacts.

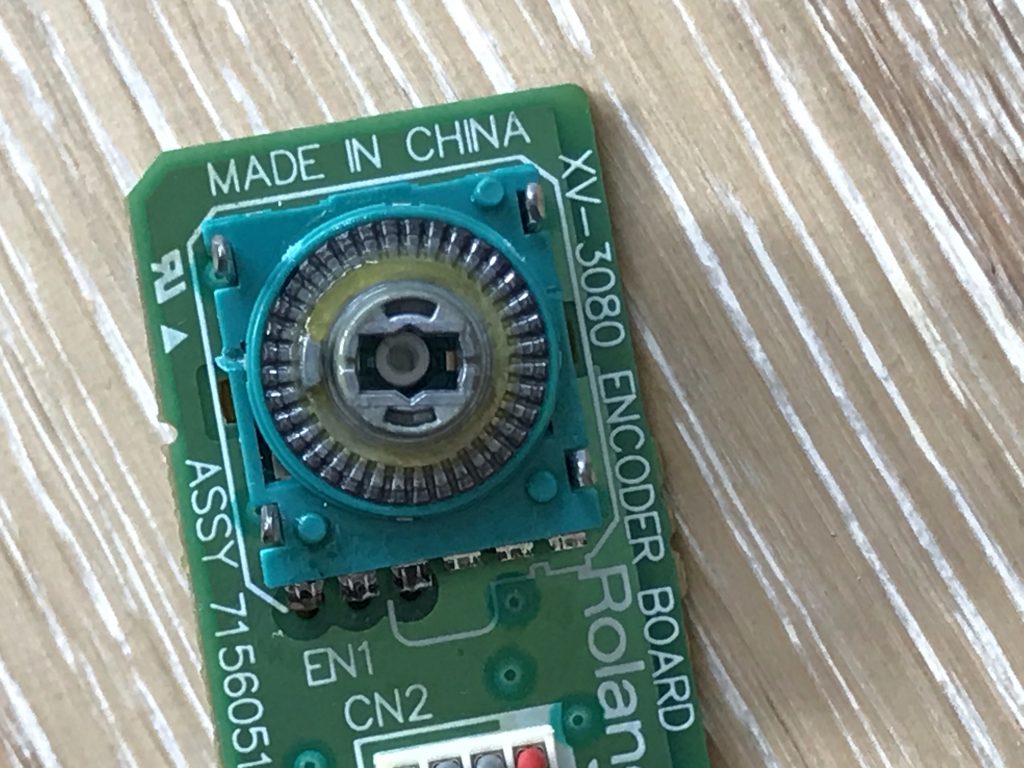
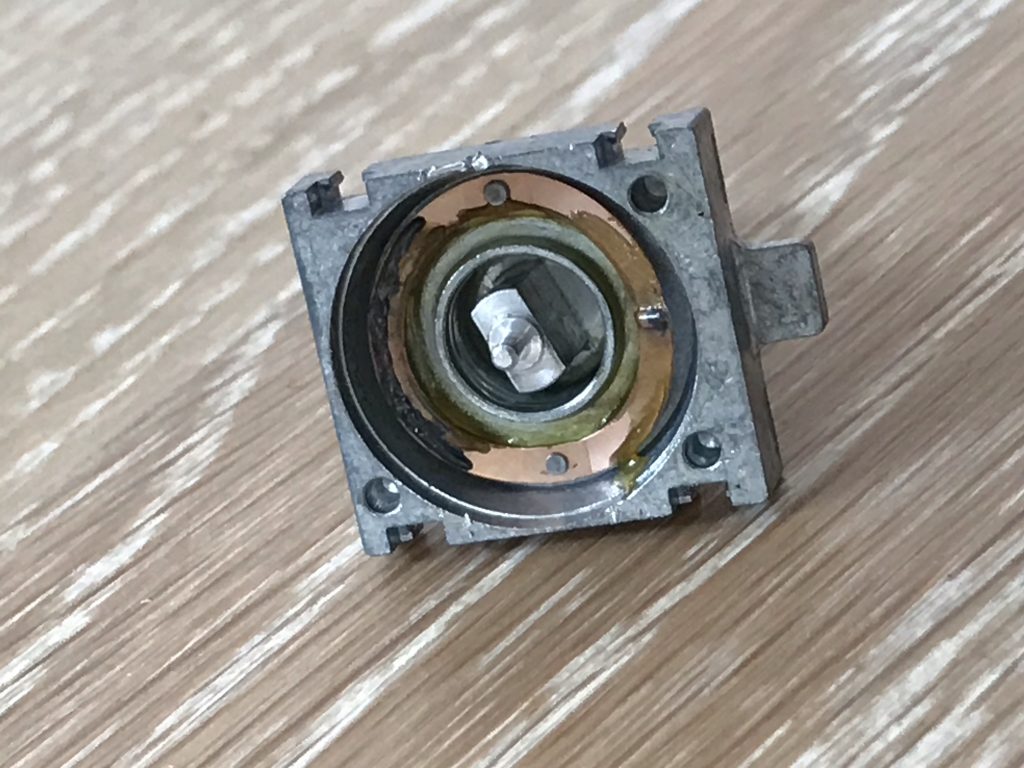
Cleaning time: remove excess lubricant fat with the screwdriver from all parts, save it for later and clean all of the contacts carefully using contact spray and q-tips. I have also tried to carefully lift the thin sliding contacts for a higher pressure. Be very careful here! Probably thats not even needed.

Reapply the fat and assemble everything again. Works as new and didn’t take me more than 15mins with all the tools prepared. If it ain’t broken: clean it!

As to the reasons of why the encoder fails: Since there is no corrosion in the device my theory is that copper micro particles get caught in the lubricant and cause wrong pulses.

Posted in Uncategorized | Tagged , , , , , | Comments Off on Roland XV5080, XV3080 Rotary Encoder Problem Fixed!