
Finally I found time and motivation to upgrade an absolutely plain iMac 2019 with 8GB, 1TB hard drive and a i3 8100 CPU to super specs. It’s the third iMac that I cut open to up the RAM / SSD and this procedure has become second nature to me. Repairability and upgradeability are very important topics if you really want to claim to be a green company. Apple is on an extremely bad path here: claiming to be the greenest computer manufacturer but crippling its products with planned obsolescence. And that’s completely unfair to its devices: an iMac is like a Porsche, you never throw it for scrap.
Upgrading RAM is easy on a lot of 27″ iMacs, but as soon as you want to replace the crippling hard drive you are out of luck. You have to cut the device open. On 21″ iMacs RAM is often also replaceable once you cut it open. So these questions come up: What should I go for when upgrading? What will give me the best results?
A typical Mac user will benefit most from an SSD. Booting time, application startup, noise level are all improving by factors once you install an SSD as a replacement for the hard drive. In systems without Apple’s fusion drive, you have to install a SATA SSD. I am using Samsung EVO 860 1TB drives. You basically should not go for anything smaller, due to the fact that you have to cut the adhesives of your iMac. This is my absolutely favorite upgrade, you just can’t use a Mac without it! There is plenty videos on YouTube giving advice on the procedure. If you have a fusion drive Mac, you might try to install a M.2 with an adapter.
RAM upgrades will give you the best outcome if you are a power user and are switching back and forth between RAM-hungry apps, like Photoshop, Logic Pro, FCPX all the time. 8GB are still OK for most purposes but going 16GB will soon become a must if Apple is inflating the executables more and more. Now, if you are going for that ugly opening procedure, you might as well already install 32GB, since many iMac 21″ are supporting this as a maximum and prices are low (150€ for 32GB as compared to +600€ from Apple).
Once you have these two options in your iMac, you will have a machine for years (until till Apple makes them obsolete by preventing new OS upgrades for no (real) reasons). I have run a test on a base 2017 iMac with 32GB of RAM and 1TB SSD. I run Logic Pro X with a complex demo project, recorded a screencast, run FCPX with a movie playing back, opened all iWork apps, Notes and more, switched between apps with no visible strain or pausing between apps responding. And as a bonus: with the base CPU the fan did not pick up speed, I just couldn’t get it to rev up. So I think this is the best what you can do to your Mac.
If however you are keen on upgrading your CPU, this is possible in some of the 21″ iMacs, specifically the 2017 and the 2019 one. In the 2017 you can upgrade the 6th-Gen path CPUS, but in the 2019 you can switch from 8th-Gen to 9th-Gen CPUs. Now, to prove the point that this is possible, there is an option to upgrade the corresponding 2019 iMac 27″ to the i9 9900K. There is also some upgrade videos on this topic. However, the 27″ iMac as a different thermal spec that the 21″, so it would probably not be a great idea to use the overclocking i9 9900K in the 21″. Therefore, some folks have replaced i9 CPUs in 21″ iMacs. Some used 9900T (for laptops) and some used the 9900KF (without onboard graphics). None of these K, KF, T were an option for me. I was looking into the i9 9900 (no additions), so as soon as I got hold of one of these reasonably priced (350€), I purchased one.
Yesterday was the day: installed all components using YouTube guides and all works nice. One remark on the installation of the fan on top of the new CPU: Since the thermal paste is sticky, while installing the fan you might move the CPU out of its locked position. That would be a disaster. My approach: there is a piece on the back side of the CPU PCB that can be used to align the cooling piece to the CPU.
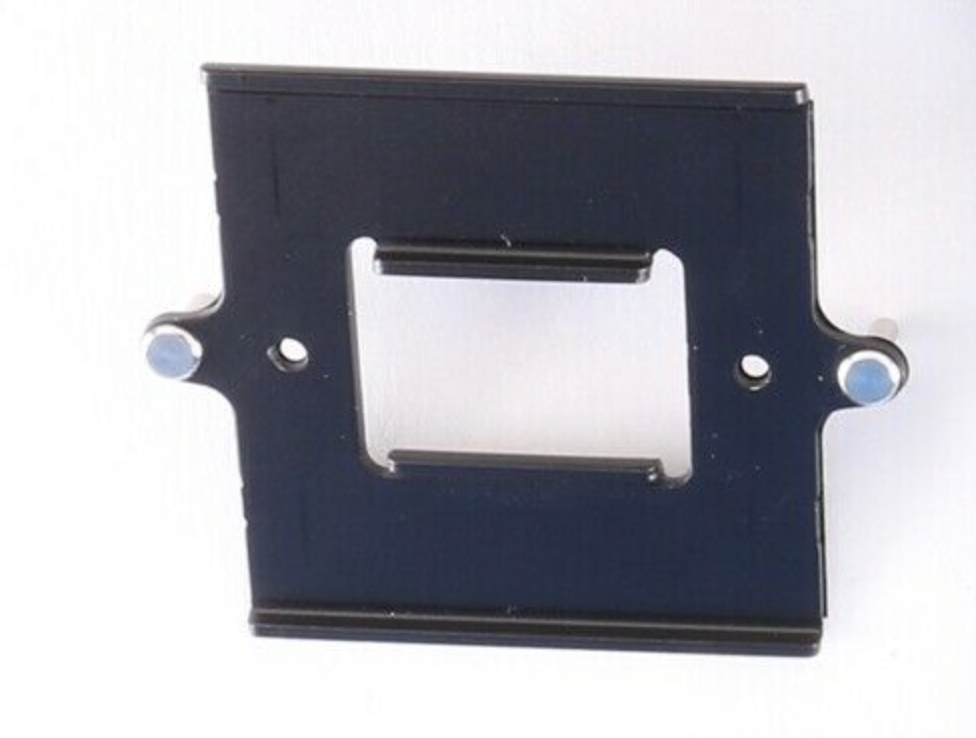
I attached that piece to the back side of the motherboard and used it to carefully first position the cooler to the CPU (put it onto the two bolts), hold it firmly in place with one hand and attached the coolers to the GPU first (GPU not CPU), then screwed to cooler to the PCB with the two screws. Only then I began screwing in the screws on the backside of the CPU. Be careful, these screws have to be pressed in quite strongly before you can begin screwing. Don’t break the board, apply pressure at the backside of where you are screwing. Worked for me.
As I sad previously, you won’t need the CPU upgrade. It even has downsides of all powerful CPUs: the fan is running during CPU-heavy workload. Also the installation is not super easy.
Here is some Geekbench 5 comparisons:
| Benchmark | i3 8100 | i9 9900 |
| Geekbench 5 Single | 893 | 1250 |
| Geekbench 5 Multi | 3389 | 8001 |
| Cinebench 23 Single | – | 1254 |
| Cinebench 23 Multi | – | 10042 |
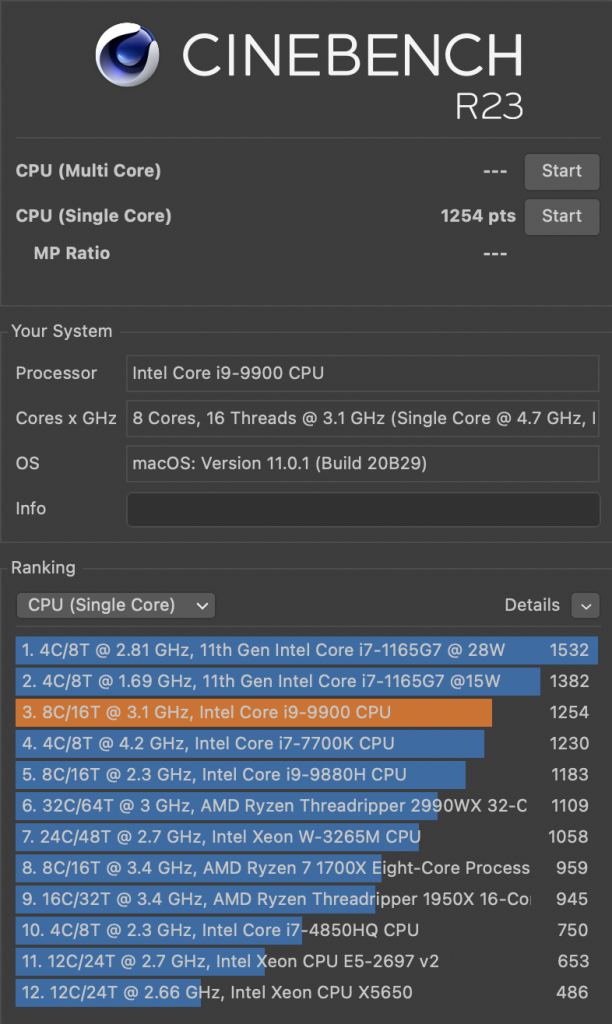
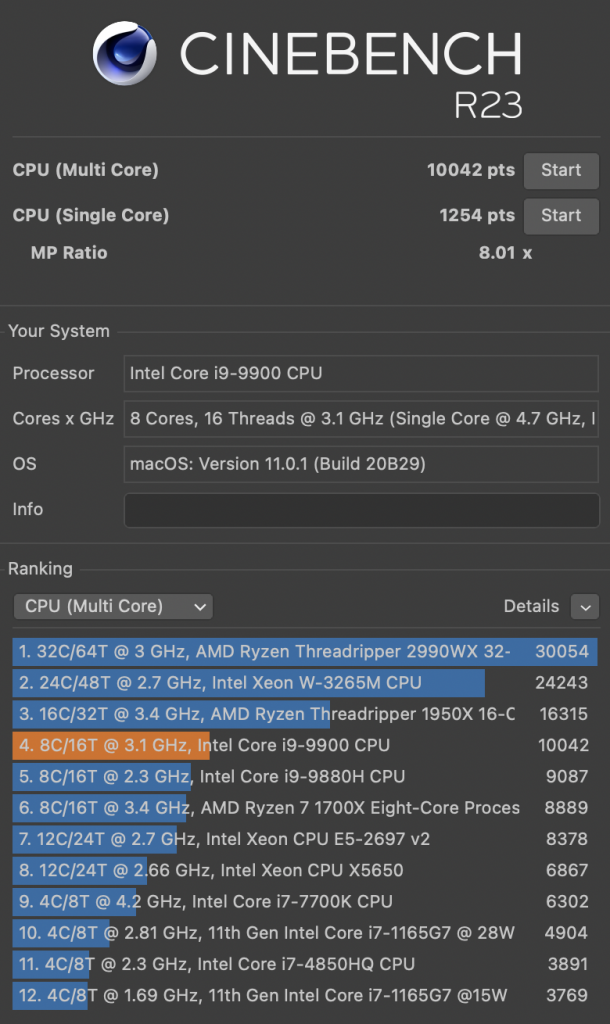
The Cinebench Multi Core score is quite remarkable since its considerably faster than the new M1 scores! But of course at a completely different power and thermal factor.
I love the upgrade, since it makes my iMac a unique piece. If anyone on this planet exists with an iMac 21″ with a i9 9900, please reach out to me on Twitter.
Warning: You will loose warranty on any of the upgrades described above. You may even be destroying your computer. Apply at your own risk!